The proper technique for setting a single anchor can be broken down into four phases of action: the approach, the drop, paying out rode, and setting the anchor. Follow these steps each time you anchor, and you give your anchor the best chance of setting and holding your boat.
- The Approach
- The Drop
- Paying Out Rode
- Setting the Anchor

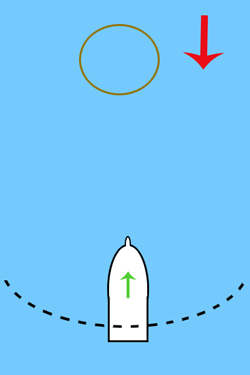
 The Approach: Approach your anchor drop location heading into the wind or current, whichever is stronger.
1. The Approach
Approach your anchor drop location heading into the wind or current (whichever is stronger). In the picture, the dotted line represents the area in which the boat will eventually swing on the anchor. Make sure this area will be clear of other boats and obstructions, and make sure you have some room behind the swing zone, in case your anchor drags.
The purpose of the approach is to bring the boat to a stop with the bow just a little upwind of the center of your intended drop zone. On larger boats, it may be impossible for the person at the helm to determine when the boat is in the right place, and also impossible for the person on the bow handling the anchor to communicate effectively with the helmsman due to engine and wind noise. Some simple hand signals can be very helpful; a good list of anchoring hand signals can be found at the SailNet Forums.

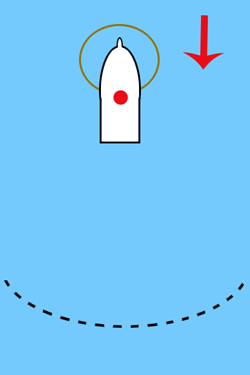
 The Drop: Lower the anchor (don't drop it!) gently as the boat drifts backward with the wind or current.
2. The Drop
The second picture (at right) shows the boat stopped just upwind of the center of the intended anchor drop zone. Make certain that the boat is no longer moving forward. It's time to lower the anchor. Don't drop it, lower the anchor gently into the water. If the boat is still moving forward, the anchor may be swept back into the bow of the boat. The boat should be starting to drift backward with the wind, so the anchor should start moving down and away from the boat as it enters the water. Lower it slowly all the way to the bottom. By the time it reaches the bottom, the boat should be moving along backward with the wind. If it is not, put the engine in reverse and start moving backwards before paying out any more anchor rode.
If your boat is stopped and you lower the anchor to the bottom and then allow all of the chain to pile up on top of it, the chain may become entangled in the anchor, preventing it from setting. By making sure that the boat is moving backward as the anchor contacts the bottom, you ensure that the anchor will be lying on the bottom facing in the correct direction, and you ensure that the chain will be stretched out straight along the bottom away from the anchor.

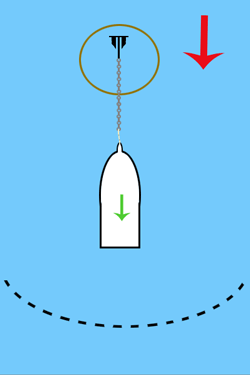
 Paying Out The Rode: Maintain a little tension on the anchor rode as you pay it out, to help keep the bow of the boat pointed into the wind and keep the anchor, chain and line from getting tangled.
3. Paying Out Rode
Keep a small amount of tension on the anchor rode as you pay it out. Too much tension will drag the anchor along the bottom, but a small amount helps to keep the bow of the boat pointed upwind toward the anchor, and helps to make sure that the anchor, chain, and rope are straight and not tangled.
In strong winds, it may be necessary to put the engine in forward to control the speed and direction of drift, while in very light winds it may be necessary to put the engine in reverse. In average winds, the boat can usually be allowed to drift backward with the wind, letting out anchor rode until the desired scope is reached.

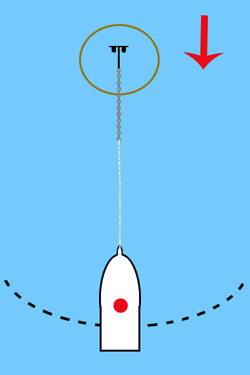
 Setting The Anchor: Secure the anchor rode to a cleat and let the anchor stop the boat.
4. Setting the Anchor
Once enough anchor rode is out and the boat is back in the intended swing zone, secure the anchor rode and let the anchor stop the boat. Be careful. Even on a small boat, the pull on the line can be much stronger than you are. Keeping your hands well clear, take a wrap around a cleat. If you still cannot stop the rode from paying out, take another wrap. Once you can control the anchor rode with one hand, use your free hand or a foot to feel the anchor rode as it comes tight. Often, you can feel an anchor that is skipping along on top of the bottom instead of digging in and setting.
Once you feel the anchor dig in a bit and set, put the boat engine in reverse and back down on the anchor to make it dig in to the bottom. In strong winds, this may not be necessary, but it is not a bad idea to do it anyway. It can't do any harm, and might reveal a weak anchor set.
In Florida and the Bahamas, you are frequently anchoring in areas of sand and grass. The layer of sand and/or grass is often only a foot thick or less, and underneath is the limestone of the continental shelf. You may think your anchor is set, but really it is clogged with grass and a corner of it has hung on a small chunk of limestone. Pull on it hard, and the limestone will break, and your clogged anchor will not reset itself. Better to find out such things while anchoring than to wait and learn them during a thunderstorm.
Once your anchor is set and you have proven it by using it to stop the boat and by backing down on it, there is one more thing you can do if the water is reasonably clear: dive your anchor. Swim out there and have a look at it. If you don't want to swim but you have a dinghy, make a clear bottom bucket so that you can take a ride out over the anchor and look down at it through the bucket.
Leave a Reply
You must be logged in to post a comment.