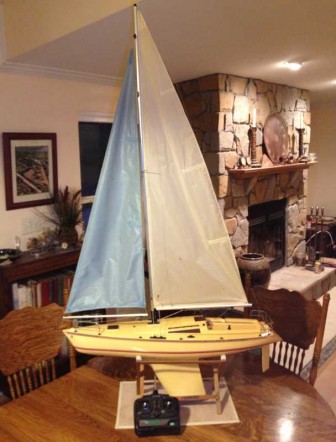
About 15 years ago, I decided to buy a remote controlled sailboat to get a quick sailing fix in the pond. Not being interested in building a model, I bought a ready-to-sail Kyosho Fairwind from a local hobby shop, took it home, and started playing with it. I really enjoyed playing with it and would take it out whenever the wind was blowing hard. It served me well for years, but eventually I left it too long between sails and a couple of the batteries in the remote control transmitter leaked, ruining the transmitter. I put it in the shed and left it there for several years.
This year I decided to use some Christmas money to put it back in service. I knew I would need a new transmitter and examination of the receiver, battery box and switch in the boat revealed corrosion around various wires and connections. I knew that the boat had gotten water inside almost every time I sailed it, and though I had been careful to wipe it out and let it dry, I figured that the servos and their connections were also about due for replacement, if not already expired. I decided to replace the sail servo and rudder servo along with the other electrical components in the boat. This did not sound as complicated as it turned out to be for a first-time modeler like myself.
On advice from some people on the rcgroups.com sailboat forum, my first step was to take detailed pictures of the set up of the boat so that I could refer back to them when installing the new servos and electronic parts.
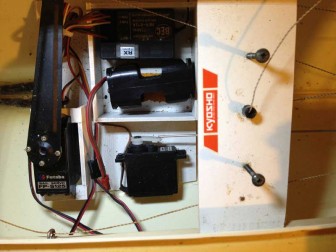
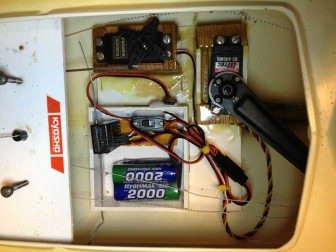
The original installation of servos, receiver and battery pack used double sided sticky tape to secure everything inside the boat. The rudder servo was set on its side on the small interior deck that held all the controls. The sail servo was screwed into a small box and the forward side of it was taped to the box to further secure it. The receiver was taped in place and the battery box had been taped in place, but repeated removals to change batteries had degraded the tape and it was no longer sticky. The batteries were held mostly by gravity, which is not a great way to go in a sailboat that can be blown onto its side in strong gusts of wind. The wires leading out the bottom of the picture at left went to the old through-deck mounted on/off switch.

Removal of the old remote controls from the inside of the boat was surprisingly difficult. That sticky tape was tenacious! The box containing the sail servo came apart when I tried to peel the servo away from the inside and I thought the hull might shatter from the force required to pull up the rudder servo. The old receiver broke away from its base and I had to take the base off by prying it with a small scraper. The only really easy part was alarmingly easy: one quarter turn on one of the two screws that were holding the on/off switch caused it to fall off! I'm very surprised it never came off when I tried to operate the switch.
All of the remote control components in the boat showed some corrosion, which was not very surprising to me because the hatch covering the electronics had always leaked a bit when the boat heeled over far enough to submerge it. A look at the switch confirmed my suspicion that it also leaked around its flexible rubber cover.
The search for replacement remote controls was not as easy as I had anticipated. How hard could it be to buy a transmitter, receiver, a couple of servos, a battery and a switch? It turned out that there are a huge variety of these parts on the market, but most are targeted at the remote controlled cars and aircraft. Many of the websites selling them did not list needed specifications like the size and torque output of the servos and I had trouble figuring out which ones would fit, which were powerful enough to use on sails, and which servos would work with the aluminum arm used on the old sail servo. The good news was that almost all of the RC units available are 2.4 GHz models, which do not suffer from the interference issues that plagued old FM models, and the new receivers are much smaller and lighter than the old one. Also, rechargable battery technology has advanced quite a bit since I bought the boat and my sources on the RC Groups forum advised me to get a battery pack that could be recharged and a power switch with a charging jack so that the batteries would not have to be removed from the boat for charging.
I spent quite a bit of time searching various hobby websites for the parts I needed and ultimately found that Hobby King had the most informative site and the best combination of prices and selection to fulfill my needs. My first attempt at compiling an order did not work out because I was unaware that all parts in a single order must come from a single warehouse, and they have warehouses around the world. The US warehouse did not carry everything I needed, so some parts would have to come from overseas. That meant all parts would have to come from overseas.
My second attempt to order ended when I found that the Hobby King special price offer on a servo was actually a bait and switch trick. Completely turned off by the dishonest tactic and the extremely slow "customer service" non-response, I decided I would never visit their site again. Frustrated by my inability to order a few simple parts online and still unsure of exactly what I needed, I decided to shop the old fashioned way: find a hobby shop within driving distance, tell them about my needs, and buy what they recommended. (The shop where I first bought the boat had gone out of business.)
I found Hobby Marketplace, a dealer with locations in Sarasota and Bradenton, and they were a pleasure to work with. I did end up having to make two trips because of minor problems with the order and my own ignorance about the details of these devices, but I will definitely return to them for any future needs. They also own and operate an online division called Robot Marketplace.
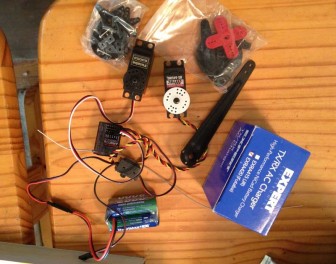
The new remote control components I bought were a Spektrum DX5e transmitter with Spektrum AR600 receiver, a HiTec 645MG sail servo, Futaba S3003 rudder servo, Hobbico HydriMax 2000mAH NiMH battery pack, Expert Electronics battery charger and a small standard on/off switch with battery charging jack. After my first attempt at making the new components work together resulted in failure and another trip up to Hobby Marketplace, I asked the guy at the store to plug them together and get them all working before I left the shop, and I left them plugged in until I got home and could take a picture of the proper setup, shown at right.
The new sail servo's plastic disc did not have holes that lined up with my old sail servo arm, so it was necessary to drill four new holes to install the arm onto the servo. In a decision I may one day regret, I decided to secure the four screws and glue the parts together using West System G-Flex epoxy. It may be hard to remove if that ever becomes necessary, but I could always buy or fabricate a new sail servo arm. At least it will not come off in use!
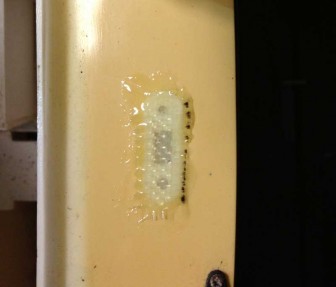
Having a bit of epoxy left over and some 6 oz fiberglass cloth on hand, I cut off a small piece of cloth and layed it over the hole where the on/off switch had been installed through the deck. I had decided to eliminate the problem of leaks around the switch by installing it inside the boat. This will mean removing the deck hatch to turn the boat on and off, but it is only secured with two screws and I was in the habit of leaving it open between sails to let the boat dry, so that is really no extra hassle. In retrospect, I probably should have used a piece of fiberglass that did not have ink marks from a previous cut, but the repair was never going to blend in seamlessly since the deck underneath the old switch is the original bright white color and the rest has turned yellow with age. My repair looks kind of disreputable, but should at least be waterproof.

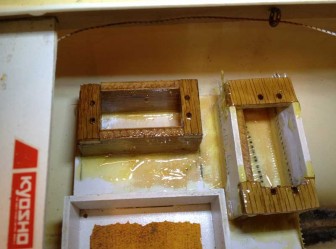
I prepared the remote control deck to receive two new servo boxes by sanding it down, blowing out the dust, and wiping it down with solvent, then set about making the new boxes. The old sail servo was a bit larger than the new one, but moving or recreating the notches in the deck that help hold the box in place seemed more difficult than simply putting a shim inside the box. That would allow me to reuse the sides of the old sail servo box with new cuts to accommodate new cross pieces for the servo mounting screws.
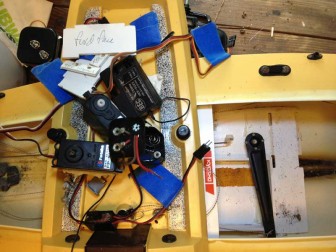
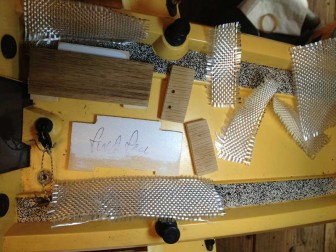
The picture at right shows the sides of the old box, one of them with the shim piece glued onto it, the new cross pieces, one of them with servo mounting holes drilled, and some scraps of fiberglass cloth to be used to add strength and rigidity to the box and the bond to the RC deck.
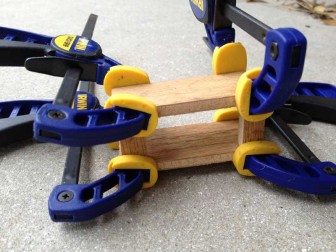
While it was necessary to assemble the sail servo box inside the boat to epoxy it into the notches in the RC deck, the rudder servo box could be assembled outside the boat and then glued in place. At left is a shot of the cross pieces clamped onto the sides of the box, waiting for the glue to dry.

When test fitting the rudder servo in its box to position it properly so that the rudder was centered in the middle of the servo range, I decided it was a good time to test fit the sail servo as well. I found that building the box exactly as long as the sail servo would not work because the wires coming out the end meant that the servo had to be worked in at an angle, requiring a slightly longer box. After a bit of puzzling over how to cut it inside the boat, I ended up using a spiral saw bit and high speed air tool to trim the edge of one cross piece a bit. This meant that the servo mounting holes were very near the edge of the cross piece.
I secured the rudder servo box using epoxy and fiberglass cloth and used the extra epoxy to coat both servo boxes so they would be stronger and more water resistant. I used an old drill bit to clear excess epoxy out of the servo mounting holes so that they would not have to be re-drilled after the epoxy cured.
Success at last! The picture at left shows the two servos screwed in place and connected to the sail sheet lines and rudder push rod. The receiver, battery pack, power switch and charging jack are all held in place with velcro and a couple of plastic wire ties, one of them connected to an eye screw through the RC deck to ensure that the wires will not foul the sheets or servo arms.
On the first test sail, I deliberately let the wind blow the boat over several times to see how much it would leak, and the result was not good. When I removed the hatch, I found quite a bit of water down in the bilge. I put some foam insulation tape around the inside of the hatch lid and caulked around the rudder post with 3M 5200 sealant, just in case some of the leakage was coming from that area. The second test went better, with only a small amount of water leaking into the boat, but it is still not completely water tight. I am still pondering what to do to improve the hatch seal, but meanwhile it is good enough to sail in the pond!
Below is a short video of my test sails. I was holding the video camera in my right hand, which is usually used to control the rudder, so I was steering the boat (poorly) using my elbow. While doing this, I realized that my fancy new remote controls made it unnecessary. The left hand control on the transmitter is designed to be used to control both throttle and rudder on remote control airplanes, and I saw no reason it could not be used to control the sheets and rudder on my sailboat. After I was done sailing, I moved the rudder servo plug from the aileron slot to the rudder slot on the receiver. I will have to train my left hand to do both jobs and have not tried this setup yet, but it should make taking video and pictures while sailing easier once I learn it.

Leave a Reply
You must be logged in to post a comment.